Building Your DIY Hydroponic Seed Starting System
Beginning seeds (hydroponically) provides gardeners with exact control over their growing conditions: germination rates are also faster. However, establishing your own system at home is not only cost-effective, but also rewarding—this allows you to cultivate healthy seedlings throughout the entire year.
Essential Materials Needed
Prior to engaging in construction, it is essential to collect the fundamental supplies (which include): a growing medium, such as rock wool cubes or coco coir. However, one must consider the specific requirements of the project, because the choice of medium can significantly influence the outcome. Although these options are popular, there may be other alternatives worth exploring. This preparation is crucial, as it lays the groundwork for successful implementation.
• Waterproof container or tray
• Air pump with air stone
• Nutrient solution
• Net pots or seed cells
• pH testing kit
• Plant labels
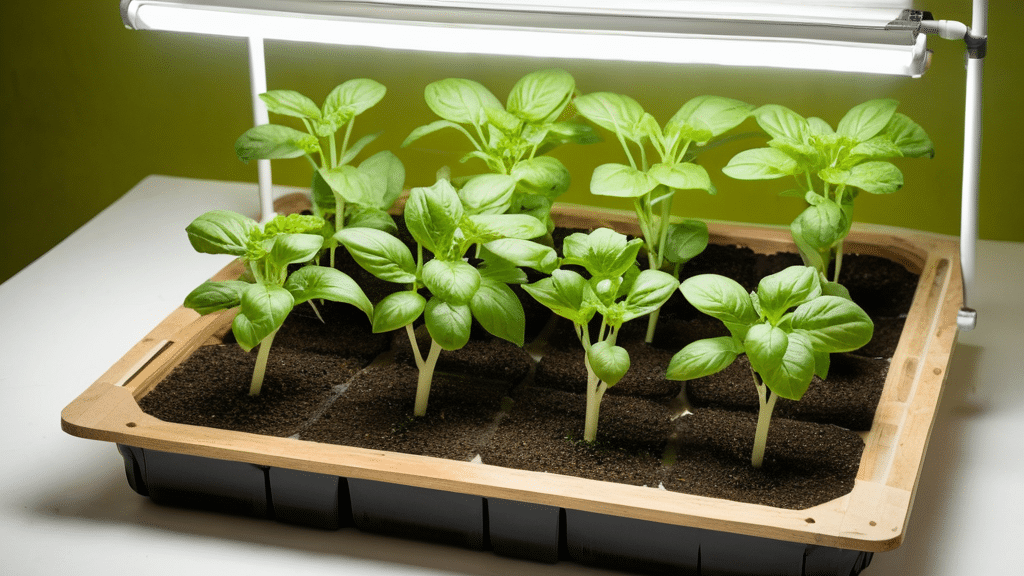
• LED grow light
Setting Up Your Base System
Begin by preparing your growing container (a shallow plastic tub is ideal for seedlings). Drill holes in the lid to accommodate net pots or to create areas for your growing medium (position these holes approximately 2-3 inches apart). This spacing allows seedlings enough room to develop.
Next, install the air stone at the bottom of your container, connecting it to the air pump with airline tubing. This setup provides crucial oxygen to the developing roots. Fill the container with water, but leave about an inch of space at the top. Add a small amount of hydroponic nutrients; seedlings require very minimal feeding initially, however, this is essential for their growth.
Preparing Your Growing Medium
Rock wool cubes are particularly well-suited for initiating seed growth. It is advisable to soak them in pH-balanced water (ideally at levels between 5.5 and 6.5) for a number of hours prior to utilization. This process eliminates any residual manufacturing substances and establishes an optimal environment for germination. However, if one opts for coco coir, it is essential to pre-soak and rinse it meticulously to eliminate any excess salts (which can hinder plant development).
Optimal Environment Creation
Position your LED grow light approximately (6 inches) above the location where your seedlings will emerge. Seeds do not require light for germination; however, they will need it right away once they begin to sprout. To achieve optimal germination rates, maintain temperatures in the range of 70-75°F (21-24°C). Although this may seem like a narrow window, it is essential for success.
Planting and Initial Care
To cultivate seeds effectively, one should (1) place 2-3 seeds in each cell of the growing medium. If the seed package specifies that darkness is necessary for germination, lightly cover them. It is essential (2) to maintain consistent moisture in the growing medium; however, be cautious not to overwater, as this can lead to waterlogging. Daily monitoring of water levels is crucial (3) because it ensures optimal conditions for growth and one should top off the moisture as needed.
Maintenance Requirements
It is crucial to monitor pH levels every few days (adjusting as necessary) to sustain the optimal range. Once seedlings emerge, it is essential to ensure proper air circulation with a small fan; this strengthens stems and prevents mold growth. Furthermore, replace the nutrient solution weekly (because this maintains proper feeding levels). However, attention to detail is important, because neglecting these factors could lead to adverse outcomes. Although the process may seem simple, consistent care is vital for success.
Transitioning Seedlings
As seedlings (once they begin to develop) their initial true leaves, it is advisable to increase the nutrient strength slightly. Humidity should be maintained at approximately 65% during the early stages of growth; however, it can be gradually reduced as the plants grow stronger. This hardening process is essential (because it prepares them) for the eventual transplanting, but it must be done with care. Although it may seem simple, the right conditions are crucial for success.
Troubleshooting Common Issues
Watch for these potential problems:
Algae proliferation (a common issue) often necessitates the reduction of light exposure to aquatic environments. However, it is essential to recognize that this can have varying effects on the ecosystem. Although some organisms thrive in lower light conditions, others may suffer as a result. Because of this, careful consideration must be given to balance the needs of all species involved. Reducing light exposure can be an effective strategy, but one must also be aware of the potential consequences.
• Weak stems: Improve air circulation
Yellow leaves (indicating nutrient deficiencies) necessitate an adjustment in nutrient concentration; slow growth may require a check on water temperature and pH levels. Mold, however, can be mitigated by improving ventilation and reducing humidity. By adhering to these guidelines, you will, in fact, create a highly efficient hydroponic seed starting system that produces robust seedlings ready for transplanting. Remember to keep detailed records of what works best for different plant varieties; this will allow you to refine your process over time.
This method typically results in germination rates that are 30-50% higher than those of traditional soil starting techniques, giving your garden a significant head start. Regular monitoring and timely adjustments are crucial for ensuring that your seedlings receive optimal conditions for healthy growth. Although it may take some time, with practice, you will develop a reliable system for year-round seed starting. This approach not only extends your growing season but also improves overall garden productivity.
Essential Tips for Successful Hydroponic Seed Growth
Initiating Hydroponic Seed Germination
Commencing seed germination through hydroponics affords you unparalleled control over the initial growth phases of your plants, which ultimately results in more robust and vigorous specimens. This method, devoid of soil, provides a cleaner and more efficient approach to seed germination; it also mitigates the potential for soil-borne pathogens.
Establishing Your Hydroponic Seed Germination System
Your journey towards success commences with an appropriate setup. You will require:
• A growth medium (such as rock wool cubes or coco coir)
• Seed starting tray with dome
• LED grow lights
• Hydroponic nutrient solution
• pH testing kit
• Spray bottle
• Seeds of your choice
To begin, immerse your growing medium in water that is pH-balanced (this is crucial). Rock wool cubes, for instance, require a soaking period of approximately 30 minutes to achieve an optimal pH level ranging from 5.5 to 6.5. After soaking, you should place your growing medium into the seed starting tray; however, make sure each cube possesses adequate drainage. Although this may seem simple, it is essential for successful plant growth.
Creating the Perfect Environment
Temperature and humidity are essential factors for seed germination. One should maintain temperatures within the range of 70-75°F (21-24°C) for most plant varieties. Additionally, utilizing a humidity dome is recommended because it helps sustain moisture levels at approximately 70-80% during the germination stage. Position your LED grow lights (6-12 inches) above the tray; this ensures optimal growth, running them for about 16-18 hours each day. However, it is important to monitor these conditions closely, because any fluctuations could impact the success of germination. Although these parameters are generally effective, individual plant needs may vary.
Proper Seed Placement and Care
(Place 2-3 seeds in each growing medium cell—approximately 1/4 inch deep.) For smaller seeds, you should simply press them gently into the surface; however, take care to avoid excessive force. Mist the medium regularly with pH-balanced water (utilizing your spray bottle). It’s crucial to avoid overwatering, because this can lead to damping off disease. Although this process may seem simple, attention to detail is important.
Nutrient Management
In the initial days, (plain) pH-balanced water proves to be adequate; however, once the seedlings exhibit their first true leaves, it’s essential to introduce a diluted nutrient solution at a quarter strength. Gradually, you should increase this to half strength, (because) as the plants mature, they require more nutrients. It’s important to monitor your solution’s pH daily, adjusting it as necessary to maintain optimal levels, although this may require some diligence.
Common Challenges and Solutions
Monitor these potential issues:
Leggy seedlings (which are often a sign of insufficient light) can be addressed by lowering your grow lights or increasing the light intensity. Mold growth, however, indicates that you may need to improve air circulation (because stagnant air can promote such issues) and reduce humidity. Yellow leaves are another concern; check nutrient levels and pH balance to rectify this problem. Slow germination can frustrate even the most patient gardener, but verifying temperature and moisture levels might expedite the process. Lastly, root problems often arise when proper drainage is not ensured, so it is crucial to avoid overwatering (as this can lead to various complications).
Transitioning Seedlings
When seedlings exhibit (2-3) sets of true leaves, they are prepared for transplanting into your primary hydroponic system. Gradually, humidity should be reduced by removing the dome for progressively longer periods over a span of several days. This hardening off process not only fortifies plants, but it also prepares them for their ultimate transfer, however, it is crucial to manage this transition carefully.
Maintaining Healthy Growth
Success necessitates ongoing observation. Inspect your seedlings each day (preferably in the morning) for: however, it is crucial to remain vigilant. This process may seem tedious, but it is essential to ensure optimal growth. Although some may overlook this aspect, consistent monitoring can make a significant difference, particularly because small issues can escalate quickly.
• Moisture levels in growing medium
• Temperature and humidity readings
• Light position and intensity
• Signs of nutrient deficiencies
• Pest presence
Keeping meticulous records of your progress is essential; (noting germination rates and growth patterns) allows you to gather invaluable information for future growing cycles. This data helps you refine your technique and, ultimately, improve your results. Regular maintenance is crucial to ensure that your seedlings remain strong and healthy. You should prune any yellowing leaves promptly, maintain clean equipment and ensure proper air circulation with a small fan. However, remember that each plant species may have slightly different requirements. This means you must adjust your care routine accordingly.
Through careful attention to these fundamentals, you’ll develop a reliable system for starting seeds hydroponically. This method not only produces robust seedlings, but also gives you precise control over the growing environment. Consequently, this leads to consistently successful results in your hydroponic garden, although it may require some initial effort to establish.
Conclusion
Embarking on your gardening journey with a hydroponic seed starter system (which opens up a plethora of possibilities for year-round growing success) can be quite rewarding. By adhering to the straightforward steps required to construct your own system and employing the essential growth tips, you’ll be well on your way to cultivating healthy, vigorous seedlings. It is crucial to remember that patience and vigilant monitoring are fundamental elements of successful hydroponic seed starting. As you accumulate experience, you will, however, develop a more nuanced understanding of your plants’ needs and can fine-tune your system accordingly.
When it comes to growing vegetables, herbs, or flowers, your DIY hydroponic seed starter creates a controlled environment that offers your plants the best possible start in life. The investment in both time and materials will yield benefits, such as stronger seedlings, accelerated germination rates and the gratification of developing your own growing system. Although it may seem daunting, don’t shy away from experimenting with various nutrient solutions, lighting configurations, or growing media to discover what works best for your particular needs.
Embrace the satisfaction of utilizing an effective (and water-conserving) technique that yields remarkable outcomes while remaining mindful of environmental impacts. As your seedlings flourish and transition into fully-grown plants, you will recognize the invaluable support that your hydroponic seed starting system has offered. Continue to learn and cultivate curiosity; this journey allows you to witness the evolution of your garden from its nascent stages of life. However, there are challenges along the way, but these obstacles only enhance your appreciation for the process. Although progress may seem slow at times, the rewards are well worth the effort because each moment spent nurturing your plants contributes to their eventual success.