Building Your Own Floating Raft Hydroponic System at Home
Transforming your gardening experience (with a DIY floating raft hydroponic system) presents an innovative approach to cultivating fresh vegetables throughout the year. This soil-less method relies on nutrient-rich water and buoyant platforms to facilitate plant growth; it is ideal for both novices and seasoned gardeners. Essential components for your system are necessary, however, there are several key materials needed to ensure its effective operation.
• A large, sturdy container or tank
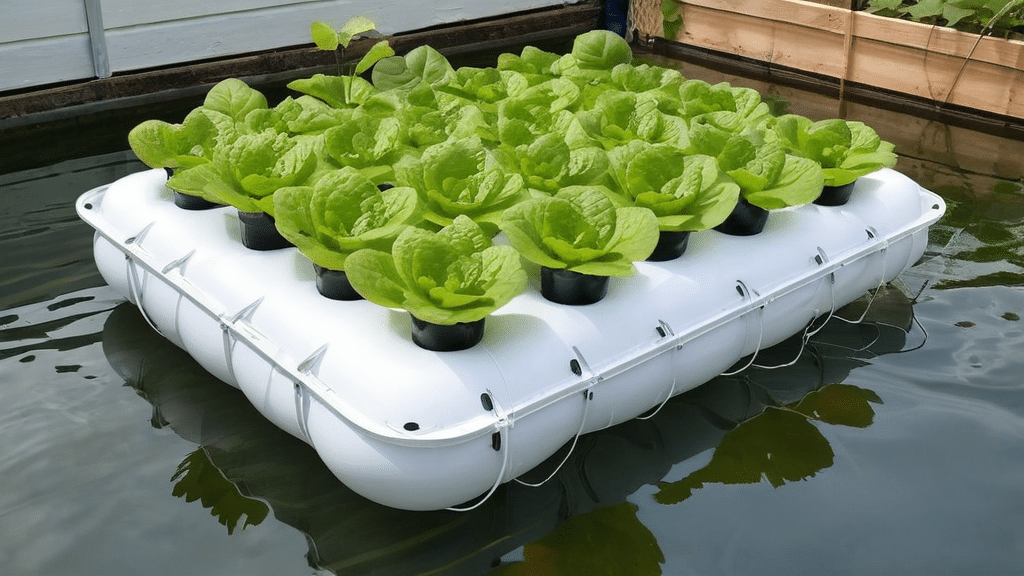
Styrofoam sheets (often used in various applications) or food-grade floating rafts serve distinct purposes. However, their utility can sometimes be underestimated. Although they may appear simple, these materials are essential in many contexts (such as insulation or buoyancy). This is particularly true in environments where lightweight alternatives are required. Because of their properties, they effectively meet the needs of diverse industries. But one must consider the environmental implications of their use; sustainability remains a critical concern.
• Air pump with air stones
• Net pots
The growing medium (such as rockwool or clay pellets) serves a crucial role in the cultivation process. However, the choice of medium can significantly impact plant health and growth. This is because different materials retain moisture and nutrients differently. Although rockwool is favored for its excellent aeration, clay pellets provide a more stable base. But, it is essential to consider the specific needs of the plants when selecting a medium. In essence, understanding the properties of various growing mediums can lead to better gardening outcomes.
• Hydroponic nutrients
• pH testing kit
• Seeds or seedlings
Setting Up Your Basic Structure
Begin by choosing an appropriate container (preferably one that is no less than 6 inches in depth). It is essential to clean it meticulously and ensure that it is light-proof: this will help prevent the proliferation of algae. Position the container in a location that receives sufficient light; however, it should also be shielded from severe weather conditions.
Next, create holes in your styrofoam sheet, spacing them appropriately according to the plants you have selected. Standard spacing often varies from 6 to 12 inches (depending on the type of plant). The holes must correspond with the size of your net pots to ensure a snug fit.
Building the Aeration System
Proper oxygenation is essential for the healthy development of roots. One should install an air pump (that is powerful enough for the container size) – generally, it is advisable to use 1 watt per gallon of water. Connect air stones to the pump (using airline tubing), positioning them evenly across the bottom of the tank for uniform oxygen distribution. However, achieving this balance can be tricky, because the placement affects the overall efficiency. Although it may seem straightforward, attention to detail is vital to ensure optimal results.
Preparing the Growing Environment
Fill your container with water (leaving approximately an inch of space at the top). Add hydroponic nutrients according to the manufacturer’s instructions; most leafy greens typically thrive with an EC (electrical conductivity) level ranging from 1.0 to 1.4.
Maintain water pH levels between 5.5 and 6.5 for optimal nutrient absorption, however, test daily during the initial week. Afterward, adjust your testing schedule based on how stable your system remains, although this may vary.
Plant Selection and Growth Support
Select vegetation that is particularly compatible with hydroponic systems (considering factors such as growth rate and nutrient requirements). However, it is essential to recognize that not all plants thrive equally in these environments. For example, leafy greens often flourish, but fruit-bearing plants may present more challenges. Although hydroponics can offer numerous benefits, this method requires careful attention to specific needs. Because of these complexities, thorough research is advisable before making a selection.
• Lettuce varieties
• Spinach
• Herbs like basil and mint
• Kale
• Swiss chard
Inserting seedlings into net pots, which are filled with your selected growing medium (this is crucial), is a fundamental step in the process. It is essential that the bottom of each pot comes into contact with the nutrient solution. This contact is vital because it allows the roots to develop properly. However, one must be cautious, as over-saturation can lead to issues; although the objective is healthy growth, balance is key.
System Maintenance Tips
It is essential to monitor water levels on a daily basis (especially during the warmer months) when evaporation tends to increase; thus, one should top up with nutrient solution as necessary. Complete water changes should be performed every 2 to 3 weeks.
Additionally, air stones must be cleaned monthly to avert mineral buildup. One should also check plant roots weekly for any signs of disease or discoloration. Maintaining a consistent temperature (between 65 and 75°F, or 18 to 24°C) is crucial for optimal growth. However, achieving this balance can be challenging because various factors can affect the overall environment.
Troubleshooting Common Issues
Addressing potential problems swiftly is crucial for the sustenance of healthy plants. Yellowing leaves (often a symptom of nutrient deficiencies) can be alarming; however, root browning might also signal oxygen deficiency. Additionally, slow growth could indicate insufficient lighting, because plants require adequate light for photosynthesis. This, in turn, can lead to algae formation, which suggests that light penetration in the reservoir is compromised. Although these issues may seem minor, their impact on overall plant health should not be underestimated.
Advanced System Modifications
Consider these enhancements as you accumulate experience (1): they can significantly improve your performance. However, it’s essential to weigh the benefits against the costs. Although you may feel tempted to implement every upgrade, this may not always be the most prudent choice. Some upgrades are more beneficial than others, but the right decision often depends on your specific circumstances. Because of this, take the time to analyze each option carefully before proceeding.
• Automatic pH monitoring systems
• Water level sensors
• Temperature control mechanisms
• LED grow lights for indoor setups
• Nutrient dosing pumps
Maintain meticulous documentation of your system’s performance—this includes (but is not limited to) nutrient levels, pH readings and rates of plant growth. Such information is vital because it aids in optimizing your setup over time. However, it also ensures consistent results with every growing cycle.
It is important to remember: clean and sanitize all components before initiating a new growing cycle. Although proper maintenance and attention to detail are crucial, your DIY floating raft hydroponic system can yield (fresh, healthy produce) year-round. This approach conserves water and space, especially when compared to traditional gardening methods.
Essential Components and Maintenance for DIY Hydroponic Success
Constructing a DIY floating raft hydroponics system provides an efficient (and cost-effective) method for cultivating plants without the need for soil. This innovative approach to gardening enables plants to flourish by suspending their roots directly in nutrient-rich water, thus maximizing growth potential and minimizing resource waste.
The foundation of a successful floating raft hydroponic setup (is) reliant on essential components that work cohesively. You will require a large, waterproof container or reservoir to maintain the nutrient solution. It is advisable to select food-grade materials, such as HDPE plastic, to ensure the safety of growing edible plants.
A robust floating platform, typically composed of foam board or polystyrene, acts as the base for your plants. This platform must be thick enough to support the weight of the plants while floating effortlessly on the water’s surface. Additionally, you should create holes in the platform that are appropriately sized to accommodate net pots, which will house your plants and facilitate the extension of roots into the nutrient solution beneath.
Setting Up the Aeration System
Proper oxygenation is essential (1) for the healthy development of roots in your floating raft system. To achieve this, install an air pump that connects to air stones via food-grade tubing. Positioning the air stones evenly throughout your reservoir is important (because it ensures uniform oxygen distribution). The bubbles created not only supply critical oxygen; however, they also assist in circulating nutrients throughout the solution. Although this might seem simple, the impact on root health is significant.
Water and Nutrient Management
Maintaining appropriate nutrient levels and ensuring water quality is essential for the success of plants. It is advisable to test your water’s pH levels daily, utilizing a reliable meter; the goal should be to maintain readings within the range of 5.5 to 6.5 for most plant varieties. Additionally, you should monitor the electrical conductivity (EC) of the nutrient solution to guarantee that the concentration of fertilizer is adequate.
You must replace the nutrient solution entirely every two to three weeks (or even earlier if you observe significant fluctuations in water quality). Furthermore, it is important to keep the water temperature between 65-75°F (18-24°C) to promote optimal nutrient absorption and root health.
When it comes to plant selection and growth considerations, it is crucial to choose plants that are well-adapted to floating raft systems. Leafy greens such as lettuce, spinach and various herbs tend to exhibit exceptional performance. These plants, because they possess relatively lightweight structures, thrive in aquatic environments. However, ensure that there is proper spacing between the plants to facilitate adequate air circulation; this will help prevent overcrowding as they grow.
Maintenance Routine
To ensure the efficient operation of your system, (it is essential to establish) a regular maintenance schedule: check water levels daily; top off as needed. Additionally, you should clean net pots and remove any dead plant material on a weekly basis. Monthly inspections of air stones and pumps are crucial for proper functionality. Monitor plant health closely—watch for signs of nutrient deficiencies. Although this may seem tedious, clean and sanitize the reservoir during solution changes, because neglecting these tasks can lead to significant issues. However, a consistent routine will yield better results in the long run.
Troubleshooting Common Issues
Addressing potential issues swiftly is crucial for preserving system health. One should be vigilant for signs of algae proliferation, which can be mitigated by ensuring your reservoir remains light-proof. If plants exhibit yellowing leaves, it’s important to check both nutrient levels and pH balance. Root rot—often signified by brown, mushy roots—frequently indicates inadequate oxygen levels or poor water circulation.
Moreover (however), monitoring ambient temperature and humidity levels within your growing area is essential. Installing fans may be necessary to maintain adequate air circulation and to prevent moisture-related complications. Regular maintenance of the system, coupled with prompt attention to emerging issues, will significantly contribute to the success of a thriving hydroponic garden.
It is also vital to maintain meticulous records of maintenance activities, nutrient adjustments and plant performance. This information can become invaluable for optimizing your system over time and achieving consistent results with your floating raft hydroponic setup. Although these practices require diligence, with proper attention to these essential components and maintenance protocols, you will be well-equipped to cultivate healthy, productive plants in your DIY hydroponic system.
Conclusion
Establishing your own floating raft hydroponics system is a gratifying endeavor that unveils limitless opportunities for year-round cultivation. By adhering to the step-by-step construction process and ensuring proper maintenance of your system, you can develop a sustainable and effective approach to cultivating fresh produce right at home. It is crucial to remember that success in hydroponic gardening stems from consistent observation, regular upkeep and a readiness to learn from experience.
Your DIY floating raft system not only reduces expenses in comparison to commercial setups; however, it also grants you total control over your growing environment. As you become increasingly acquainted with your system, you will uncover which plants flourish best and how to optimize growth conditions for optimal yields. The elegance of this method resides in its simplicity and scalability— you can begin modestly and expand as your confidence increases.
Do not become disheartened if you encounter initial obstacles. Hydroponic gardening—like any other skill—has a learning curve; however, the time and effort you invest will ultimately yield bountiful harvests of fresh, healthy produce. It is crucial to keep experimenting with various nutrient solutions, plant varieties and growing techniques to ascertain what works best for your specific setup. Because of proper attention to water quality, nutrient levels and system maintenance, your floating raft hydroponics system will, in fact, supply you with a sustainable source of fresh vegetables for years to come.